Welcome, dear friends, to my humble kitchen. Today, we embark on a journey to create a timeless classic: the American apple pie. This isn’t just a recipe; it’s an invitation to slow down, savor the moment, and connect with the simple joy of creating something beautiful and nourishing from scratch. Imagine the warm, comforting aroma filling your home, the sweet and tart flavors dancing on your tongue, and the feeling of contentment that comes from sharing this delightful creation with loved ones. This recipe will guide you through each step, ensuring your pie is a masterpiece of flavor and texture. Let’s begin, shall we?
This apple pie is more than just a dessert; it’s a symbol of home, comfort, and cherished memories. It’s a taste of simpler times, a reminder to appreciate the beauty of the present moment. So, gather your ingredients, put on some gentle music, and let’s create a pie that will warm your heart and soul.
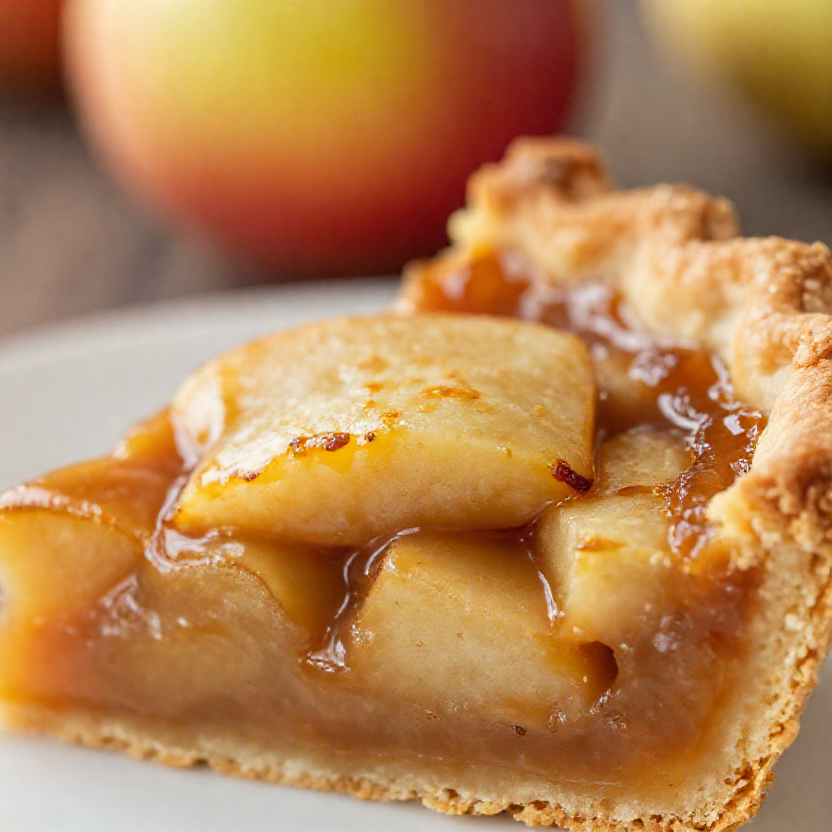
Why You’ll Love This Classic Apple Pie
This apple pie recipe is a labor of love, and I assure you, every minute spent creating it is worth it. Here’s why you’ll fall in love with this recipe:
- Timeless Flavor: The perfect balance of sweet and tart apples, complemented by warm spices, creates a flavor that is both comforting and irresistible.
- Flaky Crust: Achieving a flaky crust is the holy grail of pie-making, and this recipe guides you to exactly that. The secret lies in cold butter and a gentle touch.
- From-Scratch Goodness: There’s nothing quite like the satisfaction of creating something entirely from scratch. This recipe allows you to connect with your food on a deeper level, appreciating the process from start to finish.
- Versatile: This pie is perfect for any occasion, whether it’s a cozy family gathering, a festive holiday celebration, or a simple weeknight treat.
- Nostalgic: Every bite will bring back cherished memories, reminding you of home, family, and the simple joys of life.
Ingredients for Your Apple Pie
Here’s what you’ll need to create this masterpiece. I always encourage using the best quality ingredients you can find; it truly makes a difference in the final result.
- For the Filling:
- 6–7 medium apples (Granny Smith or Honeycrisp work best)
- ¾ cup sugar
- 2 tablespoons brown sugar
- 1 teaspoon cinnamon
- ¼ teaspoon nutmeg
- 1 tablespoon lemon juice
- 2 tablespoons flour or cornstarch
- 1 teaspoon vanilla extract
- For the Crust:
- 2 ½ cups all-purpose flour
- 1 teaspoon salt
- 1 tablespoon sugar
- 1 cup cold butter (cut into cubes)
- 6–8 tablespoons ice-cold water
Step-by-Step Guide to Making the Pie
Now, let’s walk through the steps together, one gentle step at a time. Remember, there’s no need to rush. Embrace the process, and trust your instincts.
Step 1: Prepare the Crust
The crust is the foundation of your pie, so let’s start here. A flaky crust comes from working with cold ingredients and a light touch.
- In a large bowl, mix flour, salt, and sugar.
- Add cold butter and rub it in until the mixture looks crumbly. Think of it as creating coarse breadcrumbs.
- Slowly add ice water, one tablespoon at a time, and form a soft dough. Be careful not to overmix; you want to keep the butter in small pieces.
- Divide the dough into two parts, flatten each into a disc, wrap in plastic, and refrigerate for at least 30 minutes. This allows the gluten to relax and the butter to firm up.
Step 2: Make the Filling
The filling is where the magic truly happens. The combination of sweet and tart apples with warm spices is simply divine.
- Peel, core, and slice the apples. I prefer a mix of Granny Smith and Honeycrisp for a balanced flavor.
- In a large bowl mix apples with sugar, brown sugar, cinnamon, nutmeg, lemon juice, flour or cornstarch, and vanilla.
- Toss well until evenly coated. The lemon juice helps to prevent the apples from browning and adds a lovely brightness to the filling.
Step 3: Assemble the Pie
Now it’s time to bring everything together. This is where your creativity can shine.
- Roll out one portion of dough on a lightly floured surface.
- Carefully place it in a pie dish. Trim the edges and crimp them decoratively.
- Add the apple filling, mounding it slightly in the center.
- Roll out the second portion of dough and place it on top. Seal the edges with a fork or your fingers.
- Cut small slits in the top crust to allow steam to escape during baking. This will prevent your crust from becoming soggy.
Step 4: Bake Your Pie
The moment we’ve been waiting for! The oven will transform our creation into a golden masterpiece.
- Bake at 375°F (190°C) for 45–50 minutes, or until the crust is golden brown and the filling is bubbly.
- If the crust starts to brown too quickly, cover the edges with foil or a pie shield.
Step 5: Cool and Serve Your Fresh Pie
Patience, my friend. Letting the pie cool properly is essential for the filling to set.
- Let it cool for at least 1 hour before slicing and serving. This allows the filling to thicken and the flavors to meld together.
- Serve warm with vanilla ice cream or whipped cream. A dollop of homemade whipped cream is particularly delightful.
Pro Tips for the Best Apple Pie
Here are a few extra tips to elevate your apple pie to the next level. These are the little secrets that make a big difference.
- Use Cold Ingredients: Cold butter and ice water are essential for a flaky crust. The cold butter creates steam as it bakes, resulting in those beautiful layers.
- Don’t Overmix the Dough: Overmixing develops the gluten in the flour, resulting in a tough crust. Mix just until the dough comes together.
- Blind Bake the Bottom Crust: For an extra-crisp bottom crust, blind bake it before adding the filling. Line the crust with parchment paper and fill it with pie weights or dried beans. Bake for 15 minutes, then remove the weights and bake for another 5-10 minutes.
- Use a Variety of Apples: Combining different types of apples adds complexity to the filling. Granny Smith provides tartness, while Honeycrisp adds sweetness and crispness.
- Let the Pie Cool Completely: This is perhaps the most important tip. Letting the pie cool allows the filling to set properly, preventing it from being runny.
Common Mistakes to Avoid
Even the most experienced bakers make mistakes. Here are a few common pitfalls to watch out for, so you can avoid them.
- Soggy Bottom Crust: This is the most common complaint. To prevent a soggy bottom, blind bake the crust, use a metal pie dish, and bake the pie on the bottom rack of the oven.
- Tough Crust: Overmixing the dough is the main culprit here. Remember to mix gently and only until the dough comes together.
- Runny Filling: This can happen if the filling isn’t cooked long enough or if the pie isn’t cooled properly. Make sure the filling is bubbly before removing the pie from the oven, and let it cool completely before slicing.
- Burnt Crust: To prevent the crust from burning, cover the edges with foil or a pie shield during the last 15-20 minutes of baking.
- Not Enough Flavor: Don’t be afraid to experiment with spices. A pinch of cardamom or ginger can add a lovely warmth to the filling.
Apple Pie Variations
Once you’ve mastered the classic recipe, feel free to experiment with different variations. Here are a few ideas to spark your creativity.
- Caramel Apple Pie: Add a layer of caramel sauce to the bottom of the crust before adding the apple filling.
- Cranberry Apple Pie: Mix cranberries into the apple filling for a tart and festive twist.
- Apple Crumble Pie: Instead of a top crust, use a crumble topping made with flour, butter, sugar, and oats.
- Apple Galette: For a rustic look, make an apple galette instead of a pie. Simply roll out the dough, arrange the apples in the center, and fold the edges over the filling.
- Vegan Apple Pie: Use a vegan butter substitute and a flax egg to make a vegan version of this classic pie.
How to Store Your Apple Pie
If you happen to have leftovers (which is rare!), here’s how to store them properly.
- Room Temperature: Apple pie can be stored at room temperature for up to 2 days. Cover it loosely with plastic wrap or foil.
- Refrigerator: For longer storage, keep your pie in the refrigerator for up to 5 days. Cover it tightly to prevent it from drying out.
- Freezer: You can also freeze apple pie for up to 3 months. Wrap it tightly in plastic wrap and then in foil. To thaw, place it in the refrigerator overnight.
Frequently Asked Questions (FAQ)
Here are some common questions about making apple pie, answered with love and care.
- What are the best apples to use for apple pie? Granny Smith and Honeycrisp are my favorites, but you can also use a mix of other varieties like Braeburn, Gala, or Fuji.
- Can I use store-bought pie crust? Yes, but homemade is always better! If you do use store-bought, make sure to buy a high-quality brand.
- How do I prevent the crust from browning too quickly? Cover the edges with foil or a pie shield during the last 15-20 minutes of baking.
- Can I make the pie ahead of time? Yes, you can make the pie a day or two in advance and store it in the refrigerator. You can also freeze it for longer storage.
- Why is my filling runny? This can happen if the filling isn’t cooked long enough or if the pie isn’t cooled properly. Make sure the filling is bubbly before removing the pie from the oven, and let it cool completely before slicing.
Serving Suggestions for the Perfect Pie
Finally, let’s talk about how to serve your beautiful apple pie. These simple touches can elevate the experience.
- Warm with Ice Cream: A scoop of vanilla ice cream is a classic pairing. The cold ice cream melts slightly over the warm pie, creating a delightful contrast of temperatures and textures.
- Whipped Cream: Homemade whipped cream is always a treat. Add a touch of vanilla extract or a sprinkle of cinnamon for extra flavor.
- Caramel Sauce: Drizzle a bit of caramel sauce over the pie for an extra touch of sweetness.
- Cheddar Cheese: In some regions, it’s traditional to serve apple pie with a slice of cheddar cheese. The sharp cheese complements the sweet pie beautifully.
- A Cup of Tea or Coffee: Enjoy your apple pie with a warm cup of tea or coffee. The comforting flavors will warm your soul.
And there you have it, dear friends. A classic American apple pie, made with love and care. I hope this recipe brings you as much joy as it has brought me. Remember, cooking is an act of love, so embrace the process, trust your instincts, and savor every moment. Until next time, may your kitchen be filled with warmth, laughter, and the sweet aroma of homemade goodness.

Classic American Apple Pie
Ingredients
Method
- Mix flour, salt, and sugar. Add butter and rub in until crumbly. Slowly add ice water and form dough. Divide, wrap, and refrigerate for 30 minutes.
- Peel and slice apples. Mix with sugar, brown sugar, cinnamon, nutmeg, lemon juice, flour, and vanilla. Toss well.
- Roll out dough and place in pie dish. Add filling. Roll out second dough, place on top, seal edges, and cut slits.
- Bake at 375°F (190°C) for 45–50 minutes until golden brown and bubbly.
- Cool for at least 1 hour. Serve warm with ice cream or whipped cream.
Notes